Crucial Steps in Slab Leak Location Process
On a quiet Tuesday morning in Keller, a local business owner walked into their office to find damp carpet and a musty smell along one wall. No visible pipe, no dripping ceiling, no overflowing sink—just unexplained moisture creeping across the floor. Within 48 hours, that “small wet spot” had turned into warped baseboards, rising humidity, and the start of mold growth. The culprit? A hidden slab leak under the concrete foundation.
In North Texas, where many homes and commercial buildings sit on concrete slabs, this scenario is far more common than most people realize. Industry studies estimate that up to 10% of properties with older plumbing will experience a slab leak at some point, and in fast-growing areas like Keller, shifting soils and temperature extremes make it even more likely.
This guide walks you through the crucial steps professional plumbers use to accurately locate a slab leak—without unnecessary demolition—so you understand what’s happening under your floors, what to expect from a quality Slab Leak Detection service, and how to protect your property, budget, and peace of mind.
Key Insight: Accurate slab leak location is a step-by-step, diagnostic process—not guesswork. The better the process, the less damage, downtime, and cost you face.
Step 1: Recognizing Early Warning Signs Before They Escalate
Most slab leaks don’t start with a flood; they start with subtle changes that are easy to dismiss. Catching those early signs can be the difference between a targeted repair and a major restoration project.
Common early indicators Keller home and business owners notice include:
- Warm spots on tile or concrete floors
- Unexplained increases in water bills
- The sound of running water when fixtures are off
- Hairline cracks in walls or flooring that seem to grow
- Damp carpet, warped wood, or musty odors near interior walls
Because many Keller properties rely on pressurized water lines beneath the slab, small pinhole leaks can run 24/7. Even a tiny leak can waste hundreds of gallons a day.
Real local example:
A family in north Keller noticed slightly warmer flooring in a hallway but put it off as “just the Texas heat.” Two months later, their water bill doubled, and they finally called for help. Testing confirmed a hot water line slab leak directly beneath that hallway. Because they waited, the leak had undermined the slab enough to cause minor foundation shifting, adding structural repair costs that could have been avoided.
“By the time you see obvious water damage, a slab leak has usually been active for weeks or months.” — Senior Technician, All Source Plumbing
Recognizing these signs early is the first crucial “step zero” before any tools come out. Once suspicion is high, the diagnostic process begins.
Step 2: Isolating the Problem with Professional Pressure & Static Testing
Once a plumber suspects a hidden leak, the next step is to confirm whether the plumbing system is actually losing water and which part of the system is affected. This is where professional testing—especially Hydro Static Testing—comes in.
How hydrostatic and pressure testing work
- Hydrostatic testing is often used on sewer and drain lines. The plumber plugs the line, fills it with water to a set level, and monitors whether the water level drops over time. Any drop indicates a leak in that section of pipe.
- Pressure testing is used on water supply lines. The system is pressurized and monitored with a gauge. If pressure falls while everything is closed, there’s a leak somewhere in the pressurized lines.
This step matters because it tells you:
- Whether the leak is on the fresh water side, the sewer side, or both
- Whether the leak is under the slab, in the walls, or outside
- How extensive the problem may be before you open anything up
Case study:
A Keller restaurant near Keller Parkway had recurring sewer odors but no visible backups. Using hydrostatic testing, our techs isolated the problem to a broken drain line under the dining area. Without this step, the owner was considering replacing the entire restroom plumbing. Instead, we targeted the failing section and then used Drain Line Replacement techniques to restore service with minimal disruption.
CALLOUT: Skipping proper testing and going straight to demolition is one of the most expensive mistakes a property owner can make.
After testing confirms a leak and narrows down the system involved, the next step is to pinpoint the exact location under the slab.
Step 3: Using Advanced Listening & Non-Destructive Location Technology
Once testing confirms a leak, the real detective work begins: precise Slab Leak Location under your concrete. Today’s best practices rely on a combination of experience and technology to minimize cutting into the slab.
Common tools for under-slab leak location
- Electronic listening equipment (acoustic detection):
Sensitive microphones and amplifiers “listen” for the sound of water escaping under the slab. By moving the sensor across the floor and comparing intensity, the technician can triangulate the leak.
- Thermal imaging cameras:
For hot water slab leaks, infrared cameras detect temperature differences in the flooring, revealing the path of hot water and potential leak points.
- Line tracing equipment:
Locators and transmitters help map the exact route of hidden water and sewer lines so you’re not guessing where pipes run beneath the slab.
- Gas tracing (in select cases):
A harmless gas is introduced into the line, and specialized detectors pick up where it’s escaping.
“Non-destructive slab leak detection is all about getting surgical-level precision before you ever touch the concrete.” — Lead Leak Detection Specialist, All Source Plumbing
Traditional vs. Modern Leak Location Approaches
| Approach | Method | Typical Impact on Property | Accuracy | Typical Use in Keller, TX |
|---|---|---|---|---|
| Guess-and-break | Break concrete based on symptoms | High damage, high repair | Low | Older, outdated methods |
| Acoustic & thermal detection | Listening devices & IR cameras | Minimal, targeted cuts | High | Standard for quality contractors |
| Full line reroute without location | Bypass entire line | Moderate, more drywall | High (no slab cut) | Homes with multiple old slab leaks |
| Camera + hydrostatic combo | Cameras in drains + testing | Minimal, non-destructive | High for drains | Common for sewer and drain issues |
In Keller, where many properties have finished flooring like tile, hardwood, or engineered planks, non-destructive Hidden Water Leak Detection can save thousands in restoration costs. Instead of breaking up large sections of slab, a trained technician can often narrow the leak area to within a few inches.
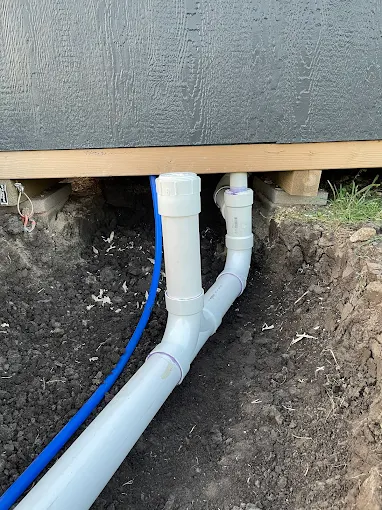
Step 4: Evaluating Repair Options – Spot Repair vs. Reroute vs. Replacement
Finding the leak is only half the battle. The next crucial step is choosing the right repair strategy for your property, budget, and long-term reliability. Not every slab leak should be repaired the same way.
Common repair strategies
- Spot repair under the slab
The technician jackhammers a small section of concrete directly above the leak, repairs or replaces the damaged section of pipe, and patches the slab.
- Best for: Newer systems with isolated damage
- Pros: Minimal disruption, lower initial cost
- Cons: Other weak spots in old piping may leak later
- Pipe reroute (above slab)
Instead of repairing the pipe under the concrete, the plumber caps off the leaking section and runs new piping through walls, ceilings, or attic space.
- Best for: Older homes with multiple past slab leaks
- Pros: Avoids future slab issues on that line
- Cons: More drywall/ceiling work, slightly higher upfront cost
- Sectional replacement or trenchless options (for drains)
For sewer or drain leaks, Trenchless Sewer Replacement or Sewer Drain Repair techniques can rehabilitate or replace damaged lines without massive excavation.
- Best for: Long runs of damaged drain lines
- Pros: Less yard and slab disruption
- Cons: Not ideal for every configuration
Local example:
A Keller homeowner in an older subdivision off Rufe Snow Drive had their third slab leak in seven years, all on the same hot water loop. Instead of another spot repair, we recommended rerouting the hot line through the attic. While the reroute required some drywall repair, it eliminated the risk of future slab leaks on that line and actually increased water pressure to distant fixtures.
CALLOUT: The “cheapest” repair today isn’t always the least expensive over the next 5–10 years. Consider age of piping, soil movement, and previous leak history.
At this stage, a good plumber will walk you through options, costs, and pros/cons so you can make an informed decision—not a rushed one.
Step 5: Protecting Your Plumbing System Before and After Repair
Once the leak is located and a repair method is chosen, the focus shifts to protecting your system going forward. A slab leak is often a symptom of underlying issues, not just a one-off event.
Addressing root causes
Common contributors to slab leaks in Keller and surrounding areas include:
- Aggressive water chemistry that slowly eats away at copper
- Poor original installation or thin-walled pipe
- Soil movement from drought/flood cycles
- Excessive water pressure in the home or building
Here’s where strategic upgrades and maintenance can make a big difference:
- Pressure regulation: Installing or checking a pressure-reducing valve to keep your system within safe limits.
- Water quality improvements: Using Water Filter & Softener systems to reduce corrosion and scale inside pipes.
- Drain maintenance: Regular Hydro Jet Drain Cleaning to prevent blockages that can stress sewer lines.
- Timely fixture and piping upgrades: Replacing failing shutoff valves, corroded supply lines, or outdated piping with modern materials through Piping & Repiping services.
“Treat a slab leak as a warning light on your dashboard. Fix the leak, but also ask why it happened.” — Master Plumber, All Source Plumbing
For many Keller homeowners, pairing slab leak repair with updates like a more efficient Tankless Water Heater or fixture upgrades can improve both reliability and comfort while plumbers already have partial access to plumbing lines.
Step 6: Minimizing Property Disruption and Coordinating Restoration
The final crucial step in the slab leak process is often overlooked: coordinating how the work affects your floors, walls, business operations, and timelines.
A well-planned Emergency Leak Detection Service and repair should focus on:
- Strategic access points:
Choosing where to open floors or walls to minimize visible damage and make restoration easier.
- Flooring considerations:
Tile, hardwood, vinyl plank, and carpet all require different approaches. In Keller’s mix of older and newer homes, it’s common to see multiple flooring types in a single property.
- Scheduling around your life or business:
For commercial spaces, that may mean after-hours or weekend work to avoid lost revenue. For homes, it may mean phasing the repair to keep one bathroom or kitchen functional.
Local example:
A small medical office in Keller Town Center discovered a slab leak under a patient corridor. Shutting down for several days wasn’t an option. By precisely locating the leak, we opened a single access point, completed the repair in off-hours, and coordinated with their flooring contractor so patients never encountered an active work zone.
Traditional vs. Thoughtful Slab Leak Repair Experience
| Factor | “Quick and Dirty” Approach | Professional, Planned Approach |
|---|---|---|
| Communication | Minimal, technical jargon | Clear explanations, options, timelines |
| Access planning | Break where convenient for plumber | Plan access to protect finishes and flow |
| Other systems (gas, drains) | Ignored unless failing | Evaluated for safety and future risks |
| Restoration coordination | “You handle it” | Guidance, referrals, and clear scope |
| Long-term perspective | Fix leak only | Fix leak + address system vulnerabilities |
What This Means for Businesses and Homeowners in Keller, TX
For Keller property owners, slab leaks aren’t just a plumbing nuisance—they’re a building and business risk. Our region’s expansive clay soils, hot summers, and occasional deep freezes put constant stress on underground pipes. Combine that with aging infrastructure in some neighborhoods and rapid new construction in others, and the odds of facing a slab leak at some point are significant.
Understanding the slab leak location process gives you several key advantages:
- You can spot problems earlier.
Recognizing signs like warm floors, musty odors, or unexplained water usage lets you act before damage spreads.
- You can evaluate contractors more confidently.
When you know to ask about hydrostatic testing, acoustic detection, and non-destructive methods, you’re far less likely to end up with a “jackhammer first, diagnose later” approach.
- You can budget realistically.
Knowing the range of repair options—from focused spot repair to reroutes or Drain Repair Service and replacement—helps you plan for both immediate fixes and long-term upgrades.
- You protect your foundation and property value.
Slab leaks can undermine concrete, create voids, and contribute to foundation movement. Prompt, accurate Foundation Leak Detection and repair protect one of your biggest investments.
For local businesses—from offices along Keller Parkway to restaurants near Old Town Keller—downtime is expensive. A thoughtful, step-by-step leak location process minimizes disruption, keeps health and safety standards intact, and preserves your reputation with customers.
In short: in Keller’s climate and soil conditions, slab leaks are a risk you can’t ignore—but with the right process and partner, they’re a manageable one.
Frequently Asked Questions
Q: How do I know if I really have a slab leak or just high water usage?
A: The simplest first check is your water meter. Turn off all fixtures and appliances that use water, including sprinklers and ice makers. If the meter dial is still moving, water is flowing somewhere. From there, a professional can perform Residential Leak Detection to determine whether the leak is in the slab, the yard, or inside walls. In Keller, we also look at patterns—like warm spots on floors, damp baseboards, or constant running sounds—as strong indicators of under-slab issues rather than just higher usage.
Q: How long does professional slab leak detection usually take?
A: For most homes in Keller, a thorough Slab Leak Detection Service takes a few hours. That includes system testing, listening, tracing lines, and confirming the exact location. Larger commercial buildings or complex plumbing systems can take longer. Rushing this step often leads to unnecessary demolition or missed leaks, so a careful, methodical process is worth the time. Your plumber should keep you updated throughout the visit and explain each step of testing.
Q: Will you have to tear up a lot of my flooring and concrete to find the leak?
A: With modern Non-Destructive Slab Leak Detection tools, extensive demolition is rarely necessary just to locate the leak. Acoustic equipment, thermal imaging, and line tracing allow us to narrow the area to a small section. When it comes time to repair, we may need to open a focused area of slab or, in some cases, reroute lines to avoid the slab entirely. In Keller homes with expensive tile or wood, we work carefully to minimize impact and coordinate with your flooring contractor whenever possible.
Q: Are slab leaks covered by homeowners insurance in Keller?
A: Coverage varies by policy, but many Keller homeowners find that their insurance helps with certain aspects of a slab leak—often the resulting damage (like warped flooring or drywall repairs) rather than the actual plumbing repair itself. Some policies offer specific slab leak endorsements. After we diagnose the issue, we can provide detailed documentation of the leak location and cause, which you can share with your insurer. It’s always wise to review your policy or talk with your agent before or shortly after scheduling Emergency Leak Detection Service.
Q: Can a slab leak affect my foundation or cause structural problems?
A: Yes. Over time, water escaping under your slab can erode soil, create voids, and contribute to differential settlement of the foundation. In North Texas clay soils, where expansion and contraction are already a concern, the added moisture from a slab leak can accelerate movement. That’s why timely Under Slab Leak Detection is so important. Fixing the leak early reduces the chance of needing costly structural repairs later and helps protect your home’s long-term stability and value.
Q: Is rerouting my pipes instead of repairing under the slab a good idea?
A: In many older Keller homes with repeated slab leaks or aging copper lines, rerouting can be the smarter long-term solution. Rather than opening multiple sections of slab over the years, we cap the failing under-slab line and run new piping through more accessible areas like walls or attic space. This approach often pairs well with upgrades like Water Heater or Tankless Water Heater Replacement, since we can optimize your hot and cold water distribution at the same time.
Q: Can I keep using my water while you’re doing leak detection and repair?
A: During certain parts of Water Leak Detection—especially pressure and hydrostatic testing—we’ll need to shut off water temporarily. We try to schedule testing and repairs to minimize disruption, and for businesses we often work during slower hours. For more extensive repairs or reroutes, we’ll give you a clear schedule so you can plan around short periods without water service. Our goal is always to balance accurate diagnostics with as little interruption to your day as possible.
Ready to Get Started?
Slab leaks don’t fix themselves, and in Keller’s shifting soils, waiting usually means more water loss, more damage, and more cost. If you’re seeing signs like unexplained water bills, warm flooring, or persistent dampness along walls, having a trusted professional confirm what’s happening under your slab is the safest next step.
All Source Plumbing offers step-by-step Slab Leak Plumbing Repair, from precise leak detection through repair and system protection. Our licensed technicians use modern, non-destructive tools, follow industry best practices, and understand the specific challenges of North Texas foundations and plumbing systems.
Whether you need scheduled diagnostics or urgent help, we’ll walk you through your options clearly—no scare tactics, no guesswork. Protect your home or business, control costs, and restore peace of mind by addressing potential slab leaks now, before they turn into major structural or mold problems.
About All Source Plumbing
All Source Plumbing is a locally owned, full-service plumbing company based in Keller, TX, serving homeowners and businesses across North Texas. Our licensed, insured team specializes in Leak Detection, Concrete Slab Leak Repair, Drain Cleaning Services, and full-system upgrades, including Tankless Water Heater Service. With years of experience in Keller’s unique soil and building conditions, we focus on accurate diagnostics, honest recommendations, and long-term solutions for every customer. Learn more about our services at All Source Plumbing.